Adjusting the Clock
You can adjust the time in the clock display with the ignition switch in ON II*1.
- Detail
-
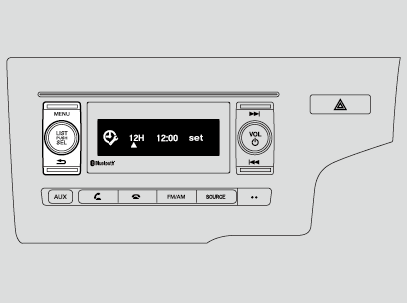
Models with monochrome audio systemThese indications are used to show how to operate the selector knob.
Rotate to select.
Press to enter.To change the setting between 12H and 24H:
Rotate to select the clock adjustment mode, then press
  . The display time begins flashing.
Rotate to select 12H or 24H.
Press complete clock mode.
Adjusting the Time
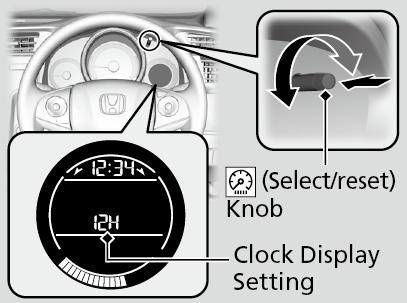
Using the  knob in the information display
-
- Press the
 (select/reset) knob repeatedly to show the clock adjustment display.
- The clock display begins to blink.
- Turn the
 knob to adjust the time.
- Turn to the right to increase the minutes.
The hour reading goes up by one after 59 is displayed. - Turn to the left to decrease the minutes.
The hour reading goes down by one after 00 is displayed.
- Turn to the right to increase the minutes.
- Press the
 to set the time.
- Press the
-

Changing the clock display
- Press the
 knob repeatedly to show the clock adjustment display.
 - Press and hold the
 knob. The clock display setting changes.
- Pressing the
 knob changes the setting between 12H, 24H and OFF.
 - Select OFF to turn off the clock display in the information display.
- Pressing the
- Press the
 knob to enter your selection.
*1: Models with the keyless access system have an ENGINE START/STOP button instead of an ignition switch.
Models with monochrome audio system
Using the selector knob
-
- Press the MENU button to select the menu mode.
- Rotate
 to select the clock adjustment mode, then press
  . The display time begins flashing.
 - Rotate
 to select the item you want to change (hour, minute). Then press
  .
. - Rotate
 to make the adjustment.
 - Press
 to enter your selection. The display returns to the clock adjustment. Repeat steps 3 to 5 to adjust other items.
 - Rotate
 and select set, then press
  to complete clock adjustment.
-

- Recommend page